Tuesday, June 27, 2023

Cooling fan upgrade

 The last time I drove, it was only about 80 degrees F outside but my coolant temperature felt uncomfortably high. I know the gauge probably isn't too accurate and I was probably worrying too much but I still felt that a cooling fan upgrade was in order. The 308 cooling system is not that great to begin with and the OEM Lucas fans are less than awe inspiring. The cheap Lucas fans used bushings that would expand when heated, seizing the fan shaft when you need cooling the most. A few years ago, one of my fans failed completely and was replaced with a Spal A48-12S. I decided to get rid of the mismatch and replace them both with Spal 30100320 pusher fans. A lot of 308 owners have had good luck with these fans so I thought I'd give it ago. They supposedly move more air than the OEM fans and draw less current. The only downsides are that they don't look OEM and they require some work to adapt them to the OEM fan motor mounts.

Here's a shot of the old fans in situ. There are mounting straps that clamp around the fan motors holding them in front of the A/C evaporator/radiator. The fan on the right is OEM and the Spal A48-12S is on the left. Like everything else on this car, access is tight but I was able to do this by going through the front grille slot and under the hood.

The first thing was to figure out how to mount the new fans. The center of the new fans line up with the centers of the old fans so it's a matter of making a "can" to fit into the OEM mounting bracket. Someone on eBay is selling a kit to adapt the new pancake fans while other people have gone the DIY route and used L brackets and their old motor shells. This seemed like a fairly simple fabrication job with some 3/16" steel plate and a section of 3" OD exhaust pipe.I started off by cutting two 3" long sections of the pipe.

Then I cut two 3" diameter circles from the steel plate. I also removed the metal plate from the new fan and cut two pieces to match.

The round pieces were welded to the pipe.These now formed "motor cans" that would fit the OEM mounting brackets.

The new Spal fans had a center protrusion and wiring and I cut out some reliefs to accommodate. To make the new cans look sort of like the originals, I decided to use outer bolt holes to hold everything together and a bolt in the center to look like the OEM motor shaft. The outer bolts are sections of 1/4" allthread with nuts welded on the plate on the inside and locknuts on the outside. The center is a 5/16" piece of allthread.


 Here's the new fan next to the old fan. At first glance, I think the new one looks like the old one.

Here's the final product, painted silver. I even tapered the center shaft and cut a slot in it to look like the original.

Everything is mounted up and looking good. I have not tested it yet on the road but I'm hoping this will really help on those warmer days.


Friday, March 19, 2021

Giving the center console some attention

 As I was about to start reassembling the interior, I realized just how shabby my center console was. It's covered in foam backed vinyl, and over the years the thin foam had mostly disintegrated and the vinyl was basically separated from the console shell. I decided to pull the cover off, clean it all up and glue it back down.

The console shell is fiberglass, and took some scrubbing to get all the old foam and glue residue off.

There are some areas where the fiberglass is in rough shape. It's interesting because you can tell whatever Italian artisan built this did not get the fiberglass mat into the corners of the mold. There are plenty of corners where it's all resin and no fiberglass. No wonder it's cracked in areas because there no reinforcement at all.

One of the lower mounting ears is nearly broken off. Now's a good time to repair it.

And also a good time to restitch a section of the parking brake boot that had come undone.


I had heard stories that back in those days, Ferrari used to use whatever they had laying around. Here's an attachment section at the base of the parking brake boot. Whoever was making it needed some extra pieces and apparently could only find some scraps of red vinyl.

 
Here's another one of these interesting little details. Inside the console was an old piece of masking tape with some writing on it. It appears to be an upside down 4, 51 and USA. My car is assembly number 451 and I've seen this number on other parts like the seat foam and other interior parts. No one will ever see this but I'm going to leave it as-is because it's a neat part of the car's history.


Saturday, March 6, 2021

Fixing the parking brake lever

It's been a long, cold and wet winter and with the 2021 driving season approaching, I decided to tear into my parking brake lever. The only thing wrong with the parking brake system was the level would not stay up. I suspected a stripped gear in the ratcheting mechanism, but I wouldn't know for sure until I tore it apart.

I removed the steering wheel, seats and the center console to get to the lever. Unfortunately there was no way to access the lever mechanism otherwise. After it was all removed, here is what the lever looks like. Notice the AB and GS markings. I'm not sure what this means, but the same marks are on the side of the shifter housing.

Here is the  other side of the lever. Every other car I've worked on has cables that connect to the lever but the 308 has an arm attached to the lever and a rod connecting to the mechanism at the rear of the car.
 

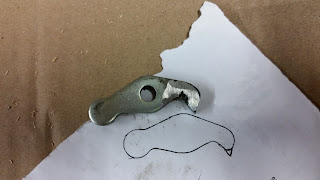
 Here is the problem. The ratcheting gear is fine, but it looks like the tip of the pawl is worn away and here was not enough material to engage the gear teeth.
 

To get to the pawl, I drilled out the pivot pin. Fortunately, I did not have to mess with the lever pivot

The tip of pawl will need to filled up and reshaped.

I welded the pawl to a piece of steel of the same thickness, then cut off the end.


Before I welded, I traced the pawl on a piece of paper and sketched what the tip should look like. I then carefully ground down the pawl to match my sketch.

This was a slow process of grinding and fitting until it all matched up.

Since I had to distroy the original pivot pin, I had to make a new one. I had some scrap stainless steel rods which was perfect for this. However, this actually took much longer than expected because I kept on taking off more material than needed and I could not get a tight fit in the pawl. After 5 tries, I finally got the pin the right size. The last thing was to drill and tap a hole to secure the end. After breaking off a tap and having to to make yet another pin, I decided to just drill a hole and use a steel pop rivet to secure the pin.

Finally, the finished pivot pin.

 And the assembled lever mechanism.

Next up -- putting the interior back together and wait for a sunny day to drive!

Saturday, December 5, 2020

The other Italian beauty is done after 8 years

 In 2012, I bought a 1959 Vespa to restore as a tribute to my dad who had recently passed away. There were lots of fits and starts but I'm happy to say that it's finally done! 

Here's what it looked like when I first got her...

and here's what she looks like now.

She runs great and with only a 3 speed transmission, can probably only go about 40 mph. That's ok though because it would probably be a little frightening to go any faster than that on those little 8" wheels. It feel so much more secure to ride on a real motorcycle, but it will be fun to kick around on this little scooter.


Sunday, October 18, 2020

What better reason to drive than to just go get a tank of fuel?

 What a junk show 2020 has turned out to be.E@RTC was canceled for the season, everyone is in lockdown and even though I've been working from home, I've been working long hours on a giant project. Months have passed but I did get a chance for a short drive before the rainy season officially arrives. I normally don't park the car without a full tank of fuel so I headed into the valley to one of the only ethanol-free stations around. Traffic is still light, but not nearly like it was in the summer when hardly anyone was on the road. 

The 2020 driving season was a bust. Hopefully 2021 will be much better.

Monday, April 6, 2020

Car is back and running better than ever!

 As I suspected, Mark was able to get things sorted. The first thing was that he found debris in the carb bowls. I'm not sure what's happening here since the fuel filter has been replaced three times. Maybe the tanks need to be cleaned out. I pulled then in 2009 and David pulled them again in 2016. Both times they looked clean but somehow junk is getting to the carbs. I'll have to keep on eye on this. I know that it's not good for these cars to sit and unfortunately.the car has been sitting more than driving. The other thing was that apparently one of my Pertronix coils was defective. That's strike three for Pertronix. I will never use or recommend their products again. At this point, I am really considering switching to Bosch coils and points.

Monday, March 23, 2020

Back in the shop...again

 I dropped off the 308 today at Mark's shop. His setup is actually similar to David's -- he's a won man show working out of a garage at his house. The main difference is that Mark works on all kinds of vehicles. There was a semi-tractor there when I dropped off. Mark had a great reputation at the dealership and I'm confident he'll get everything sorted.

Wednesday, February 19, 2020

I am officially frustrated still

 I replaced the Pertronix and the 308 is running again.  However, it's still running like crap. When I got the car back after the rebuild, the engine ran well off idle but at idle, it was popping quite a bit from the exhaust. I went through the exhaust system looking for leaks and didn't find anything. I fiddled with the carbs and it seemed to help, but the popping was still there. Overall, the car runs ok, shifts great, but is still not tuned correctly.

Years ago, at a tech session, I met Mark Glenwood, the lead mechanic at the local Dealership. Mark as years of Ferrari experience and I recently learned that after a few years on the Ferrari Challenge circuit, he's started his own shop not too car from my house. I'm going to have him go through my 308 to get get things sorted once and for all.

Sunday, February 9, 2020

Yep, over two years since the last post

 I don't even remember the last time I went for a drive. I don't remember when it was, but I can't forget what happened. It was a nice day so I decided to drive the 308 to work. On my way home, as I was only a few miles from my garage,  hear a "pop" and lose power followed by a "slow down" light coming on. I've been through this too many times and I know exactly what happened -- I lost a cylinder bank...again.

After it happened, I was so upset and frustrated that I just left the car for a while. I finally decided to do some troubleshooting and the problem ended up being a failed pickup on the Pertronix ignition system. Oddly, the new pickups were red and he previous ones were black. Not sure what that means.

 I can't say that I would recommend Pertronix at this point. The first unit was DOA and the replacement fails after less than 500 miles. If this fails again, I'm going back to points.


Saturday, November 11, 2017

Rolling the fenders

What do you do after you mess up the wheelwell of your car? After the major repairs, I was in no position to give money to a body shop to fix this. I ordered a cheapo fender roller on Amazon and I set about rolling the wheel well lip. Only one side was damaged but I rolled both side so this would not happen again. I start off carefully, trying to preserve the paint but it was really hard to prevent the paint from cracking, even with heat from a heat gun. I had to repaint part of the fenders anyway so I just made it happen. It was painful to see so much flaked off paint but I got over it. The results were pretty good and I go the lip completely rolled under for maximum tire clearance. Next up is primer and paint to fix the mess I created.


Tuesday, October 17, 2017

Seriously, is this really happening to me right now?

 After all the crazy crap I've been through with this car, I guess I should not be surprised at anything. Literally one day after my car comes back -- I break it. TK and I went for a drive today and it was awesome. As we were pulling in to the side street leading to our house, I hit a bump midway through the right hand turn and...crunch. Oh no, that didn't sound good. We pull in to the garage and I don't even want to look to see what happened. I know it's bad and I just had to walk away.

So here's what happened. The combination of a slightly wider than OEM front tire, lowered ride height and bump in the middle of a turn led to a close encounter between the tire and the wheelwell.


Another bad day...


Saturday, October 14, 2017

The eagle has landed

 After 10 long days, the car carrier rolled in to my local grocery store parking lot. Like at FSoB, there was no room for a large truck to get close to my house. The first thing I noticed was the bad ass ride height. With the coilovers, David was able to lower the car to a much more reasonably stance. The factory ride height of a 308 is ridiculous. There is enough room to put your fist between the wheel well lip and the tire. It looks so much better lowered, although I may have problems with speedbumps and driveways.


The other thing I noticed was the popping out the exhaust. Hmmm...it didn't do this before. Hopefully this is just because it's cold.

A few more shots of the mean stance.


Saturday, October 7, 2017

Homeward bound

 Quick note, my car is done and on a truck headed back across the country. Wow, what a long journey so far. There are still a few things that need to be tended to, but I'm out of money and want my ar back.

Thursday, September 14, 2017

Bring on that sweet music

 Words not needed here. I'll let the exhaust note speak for itself.


Finally back on track

In addition to the carb issues, David also suspected there was an ignition issue caused by poor EM shielding. He suspected this because of these clues:

-Erratic tach
-Erratic timing light behavior
-Odd markings in the 1-4 distributor cap
-1-4 bank plugs simply don’t look as nice as 5-8 bank

With the newly repaired carbs installed (again), new 1-4 bank distributor cap, and higher quality ignition wires, the problems seem to have gone away. The tach is glass smooth, plug cuts look a lot better and now on to final tuning (again).

As David says, “90% of carburetor issues is ignition." In this case, sounds like it was about 50:50.

Wednesday, September 13, 2017

Damn those Weber passage plugs!

 This is unbelievable. The 1-2 carb came back from Pierce and  while David was installing it, he took a moment to closely examine the other carbs. Shockingly, the 3-4 is also missing a plug! It's an easy fix and hopefully this fixes all the fouling problems!


Thursday, September 7, 2017

Smoking gun found in the carb?

 Pierce had the carburetor for a while now. Everything seemed normal on the flow bench. After a lot of back and forth, they finally did find something.

"In my 41 years of servicing Webers, I've never seen this problem."

Apparently there were 2 missing passage plugs which prevented a vacuum being drawn in the idle circuit. When he "back fed" the idle circuit, the problem became evident.

I remember I was consistently fouling a plug as well so maybe this has been an issue for a long time.

Thursday, August 24, 2017

Troubles continue

This sucks. Runnnig troubles continue. David is chasing down a few things. My car is still not running 100% correctly. The #2 plug continues to get fouled and it seems like there may be a internal problem with the 1-2. After extensive troubleshooting I agreed to have David pull the carb and send it to Pierce Manifolds for flow testing. Pierce is the leading expert on Webers in the US. Hopefully, they can figure out what's wrong with that carb?

Monday, June 5, 2017

Trouble in paradise

 I had high hopes my car would be done soon, but there seems to be a problem. During tuning and test drives, my car has developed a misfire. It seems to be fouling the #2 plug for no apparent reason. A compression test shows 150 psi on all cylinders. Plugs, wires and extenders are new. What's happening here???


Thursday, April 6, 2017

She's alive!

 After months and months of David's hard work, she's alive! Oh my goodness, listen to that engine growl!


Sunday, March 12, 2017

Ready for fire

 We're getting closer and closer to engine start. David has been working on getting everything back together. Hard to believe this is actually my engine bay. Everything cleaned up nicely and it just looks amazing. The blue hose seen in this photo comes from a pressurized oil tank, similar to an Accusump. It will ensure that there is oil pressure to all parts of the engine during those critical moments when the engine is fired for the first time,


Other goodies seem in this shot are the new oil cooler lines (custom made using the original fittings), cleaned and rebuilt carbs, freshly powder coated engine strut with new bushings, powder coated coolant tank, new AC compressor and those awesome QA-1 shocks with red Eibach springs.