Friday, March 19, 2021

Giving the center console some attention

 As I was about to start reassembling the interior, I realized just how shabby my center console was. It's covered in foam backed vinyl, and over the years the thin foam had mostly disintegrated and the vinyl was basically separated from the console shell. I decided to pull the cover off, clean it all up and glue it back down.

The console shell is fiberglass, and took some scrubbing to get all the old foam and glue residue off.

There are some areas where the fiberglass is in rough shape. It's interesting because you can tell whatever Italian artisan built this did not get the fiberglass mat into the corners of the mold. There are plenty of corners where it's all resin and no fiberglass. No wonder it's cracked in areas because there no reinforcement at all.

One of the lower mounting ears is nearly broken off. Now's a good time to repair it.

And also a good time to restitch a section of the parking brake boot that had come undone.


I had heard stories that back in those days, Ferrari used to use whatever they had laying around. Here's an attachment section at the base of the parking brake boot. Whoever was making it needed some extra pieces and apparently could only find some scraps of red vinyl.

 
Here's another one of these interesting little details. Inside the console was an old piece of masking tape with some writing on it. It appears to be an upside down 4, 51 and USA. My car is assembly number 451 and I've seen this number on other parts like the seat foam and other interior parts. No one will ever see this but I'm going to leave it as-is because it's a neat part of the car's history.


Saturday, March 6, 2021

Fixing the parking brake lever

It's been a long, cold and wet winter and with the 2021 driving season approaching, I decided to tear into my parking brake lever. The only thing wrong with the parking brake system was the level would not stay up. I suspected a stripped gear in the ratcheting mechanism, but I wouldn't know for sure until I tore it apart.

I removed the steering wheel, seats and the center console to get to the lever. Unfortunately there was no way to access the lever mechanism otherwise. After it was all removed, here is what the lever looks like. Notice the AB and GS markings. I'm not sure what this means, but the same marks are on the side of the shifter housing.

Here is the  other side of the lever. Every other car I've worked on has cables that connect to the lever but the 308 has an arm attached to the lever and a rod connecting to the mechanism at the rear of the car.
 

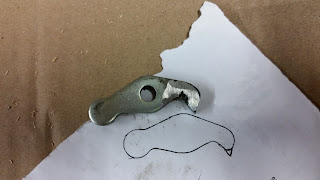
 Here is the problem. The ratcheting gear is fine, but it looks like the tip of the pawl is worn away and here was not enough material to engage the gear teeth.
 

To get to the pawl, I drilled out the pivot pin. Fortunately, I did not have to mess with the lever pivot

The tip of pawl will need to filled up and reshaped.

I welded the pawl to a piece of steel of the same thickness, then cut off the end.


Before I welded, I traced the pawl on a piece of paper and sketched what the tip should look like. I then carefully ground down the pawl to match my sketch.

This was a slow process of grinding and fitting until it all matched up.

Since I had to distroy the original pivot pin, I had to make a new one. I had some scrap stainless steel rods which was perfect for this. However, this actually took much longer than expected because I kept on taking off more material than needed and I could not get a tight fit in the pawl. After 5 tries, I finally got the pin the right size. The last thing was to drill and tap a hole to secure the end. After breaking off a tap and having to to make yet another pin, I decided to just drill a hole and use a steel pop rivet to secure the pin.

Finally, the finished pivot pin.

 And the assembled lever mechanism.

Next up -- putting the interior back together and wait for a sunny day to drive!