Tuesday, July 24, 2012

Ferrari Day 2012 at E@RTC

I'm happy to report that yes, I got the car back together, yes the cam cover does not leak (as far as I can tell), yes new plugs seem to be working out well and yes I made it to Ferrari Day 2012!


The day before E@RTC, I went for a little drive to make sure I had no leaks. The slow down light did flash on a few times but it wasn't on very much. When I got back, I pulled one of the rear bank plugs and it looked pretty clean. I'll pull it again after a few hundred miles to see what's what.


Here's part of the scene at RTC Center Court. We had about 200 cars total and 80-90 of those were Ferrari. We took up the entire center section from stop sign to stop sign. It was amazing to see a sea of Ferraris.

After the event, SL and I took a little drive and he snapped this shot out his side mirror. What a great day for a drive. The best (and strangest) part is that the slow down light did not come on at all. Not even once. At one point, I even pulled off the road and turned off the ignition, just to have the slow down system go through it's power-on test to make sure the light was still working. I expected to see that light though some spirited driving but the light stayed off. I'm not going to make any declarations yet but rather I'll just keep an eye on it.

Wednesday, July 18, 2012

Putting plugs in the front bank

Here's the part of the job that's really no fun -- getting access to the front bank to change the plugs. Don't let the photo fool you, there's not nearly as much room as it looks. Getting to the front plugs is by feel only. You can't see a darned thing and you can only get one hand in there at a time. The only way you can even reach up there is by pulling the air cleaner. As you can see, I haven't put the new spark plug wires on the front yet.

I think the this job would be a little easier if I had the original spark plug tool that came in the early 308 tool kit. I've been trying to find one for a while and I'm unwilling to pay the outrageous money that people are asking for OEM tools. Oh well. I made do with a spark plug socket, universal joint and short extension. I should also point out that I must have gotten lucky in finding a spark plug socket that works. It seems that a lot of sockets that are the right size for the plug are too large a diameter to fit into the 308 spark plug well. The socket I have just barely fits down the hole.


Here are the front plugs. They look very much like the ones in the rear, although there aren't any deposits. One is definitely more oil soaked than the rest.


After taking much more time than it should really take to change 4 spark plugs, that deed is done. I now have a brand new set of NGK Iridium plugs. Hopefully, what I've read is true and they will be more resistant to fouling.


Here's a shot of the trick I do whenever I need to remove the air cleaner. Rather than remove the engine cover, I remove two of the three bolts from the passenger side engine cover hinge. This allows me to pivot the cover up which yields just enough extra room to get the air cleaner off. The remaining bolt holds the cover in place. When I'm done, I move the hinge back and tighten up everything.

Look at that red overspray on the inside of the engine cover! Yuk! I hate people who do a crappy job. Painting is a tough job. Tougher yet to good a really good job. You can always tell a bad paint job by the amount of overspray. It just points to bad preparation and a rush (read cheap) job.

It's been two days since I put the cam cover back on and the directions on the Hondabond sealant say three days until final cure. Still, I went ahead and started to engine to make sure I had hooked up everything correctly. Sure enough, it fired right up and I let it idle for a few minutes before shutting down. Tomorrow night, I will take the car for a drive (weather permitting of course) to make sure the cam cover is leak-free. That will leave Friday for final cleaning and detailing.

Ferrari Day 2012 on Saturday!

Tuesday, July 17, 2012

Trying out some new plugs

My old plugs were all due for replacement, so I decided to try something different. I was using NGK BP6ES plugs and I read that carb 308 owners have had luck with NGK Iridium plugs. The Iridium plugs have a narrow pointed tip which creates a hotter tip and are supposedly more resistant to fouling. Many people use the lightly cooler plugs in the 7 heat range, but I decided to stick with the 6 so I went with the BPR6EIX plugs.


Compared to the BP6ES plugs, these Iridium plugs really do have a narrower tip. We'll see how resistant they are to fouling. Out of the box, the gap was way too large so I had to narrow them to the spec of 0.025". I only had time tonight to install the 4 in the rear bank. I'll tackle the more challenging front bank plugs tomorrow night.

Monday, July 16, 2012

Tick tock...getting the cam cover back on

Now that I've checked the valve clearances, it's time to button things back up. I'm got a bit of a deadline here. Ferrari Day at E@RTC is this coming Saturday and I need to get back on the road before then.


Putting the cam cover back on is no big deal, right? Well, it's not a big deal but it's more involved than say a small block Chevy valve cover. First, I scraped off the old gasket material and cleaned all the mating surfaces. When I got out the new gasket, I realized that it need to be cut to fit. Huh? Isn't that why we pay top dollar for die cut gaskets, so we don't have to do any cutting? As you can see, the gasket needs to be trimmed around the cam openings and the distributor base.

For sealant, I've used Permatex RTV Blue for the past 25 years. It's only recently that I've tried other sealants on advice from other people. A lot of people in the F-car community have had good luck with Hondabond, a sealer product made by (you guessed it), Honda. On his way by last week, SL dropped by a Honda dealership and picked some up. What the heck, I'll give it a shot and see if it works better than the tried and true RTV Blue.


A little trimming with a pair of scissors and the gasket (now three separate pieces) fits well. I put a little dab at the corners where the gaskets meet the cam seals and bolted the cam cover back on. According to the Hondabond packaging, the sealant takes a full 3 days to cure completely. I'll wait until later in the week to fire up the engine just to make sure.

Wednesday, July 11, 2012

More troubleshooting

Ok, next step in troubleshooting -- pull the plugs to see what they look like. Unburnt fuel in the exhaust means either too much fuel or incomplete ignition. I already checked the carbs and I think the mixture is good. Now let's check the ignition. Below are the plugs 1-4 (right to left).


Plugs 1/3/4 look ok, but have some deposits on them. Yikes, what's going on with plug #2? It's gotten really fouled from either running rich, leaking oil or a little of both. The original plugs I removed three years ago did not look like this. Perhaps they got fouled from all the fiddling I've done with the carb mixture. Anyhow, I'll replace the plugs and now's a good time to finally put in those new Accel 8mm ignition wires that have been sitting on a shelf. Perhaps I had a bad ignition wire leading to poor combustion.


The wire connection a the plugs is pretty much standard, but the way the wires attach to the distributor cap is very unique. The wires fit into a hole in the side of the cap and there is a sharp screw that enters the post and pierces the wire to make the connection. There are 2 different lengths used at different thickness of the cap.


The main reason I got these wires was they allow elimination of the OEM spark plug extenders. The stock setup is the ignition wire connecting to an extender which then reaches way down into the spark plug hole to connect to the end of the plug. These extenders are notorious for going bad. Someone on Fchat posted about this Accel wire set which I think is originally for a Honda Vtec engine. The only thing is that they are too long out of the box. All I had to do though was to cut off about an inch on the extension. It fits pretty well in the plug hole and this solution is about 1/10 the cost of OEM wires.


With the plugs out, it was a good time to do a compression test. SL and I did the test with me doing the cranking and him looking at the gauge. The numbers we got seemed a little low, but I realize now that I forgot to hold open the throttle while doing the test. Anyhow, I was less interested in the actual numbers as I was consistency across cylinders. The difference between the high and low values was only 7% so I'm going to call that good.

One other thing to check while I'm back there is the valve clearances. Another possibility for running hot and incomplete combustion is too tight of clearance on the exhaust valves. So, off comes the rear cam cover to gain access to the valve train.


The factory spec on a 2-valve engine is 0.008-0.010" on the intake and 0.012-0.016" on the exhaust. I checked all the valves twice and the all the exhaust valves are within spec. All the intake valves are a little tight by about 0.002-0.003".


Lastly, since the cam cover is off and I can see the cam position, I did a leakdown test. I'm using a cheapo Harbor Freight leakdown tester, which is really hard to calibrate to get a leakdown number. However, like with the compression test, I was less concerned about the actual numbers than I was consistency. All 4 cylinders in the rear bank showed about the same level of leakage. With a garden hose to my ear, I could tell that all cylinders showed leakage out the rings and little to none out the exhaust valves. No detectable leakage out the intake valves, except for #1 which I could clearly hear leaking out the carb throat.

Conclusion? Aside from the bottom end being tired and some leakage in one intake valve, things seem to be ok (not good, not great, just ok) in the rear bank. I can't explain the ugly #2 plug so all I can do it put in new plugs and put it all back together. Maybe the new wires and plugs will reduce any incomplete combustion and keep the cat cooler.

to be continued...

Tuesday, July 10, 2012

Airbox off again

Overheating cat means unburned fuel so the next thing to do is to check and adjust the mixture. Originally, this car had 55 size idle jets and 120 mains. I fiddled with different sizes before settling on 57/125. Figuring that the cats added more exhaust backpressure, I decided to lean out the mixture to see what would happen. As it turns out, I was able return to my original jetting with no popping or hesitation. However, even though it's running much leaner, I'm still getting an intermittent 1-4 slow down.

While I had the airbox off again, I remembered an FChat post talking about how restrictive the US carb airbox is. At the inlet, there is a bunch of wire mesh tack welded to the inside of the airbox and a bunch of fiberglass insulation. I decided to go ahead and remove it to try and improve inlet airflow as well as remove the sound insulation so I could hear the carbs better.


I used a hammer, chisel and snips to pry out the mesh. As you can see, this opened up the inlet quite a bit and you can actually hear the carbs better. I'd say this was a pretty good modification!

One thing which has really bugged me are the air intake ducts on the sides of the car. The guy who did the paint did not mask off the black intake ducts and there was a lot of red overspray. It just made it look like bad cheapo paint job.


I pulled the intake ducts from both sides, cleaned them up and sprayed them with some VHT high temp flat black. I'm really happy with the way they turned out and it makes the outside of the car look much cleaner.

Monday, July 9, 2012

Testing out the "Slow Down" system

After having been on a dozen or so drives, it's clear to me that I need to get to the bottom of this "slow down" light issue. A month or so ago when I installed functional catalytic converters, I started getting an intermittent slow down light on the 1-4 cylinder bank. This means that the 1-4 cat was getting hot enough to trigger the alert system.

First I needed to know where was the problem. The first thing to check was the actual alert system itself because I didn't know if the light was a false alert or an actual overheating situation. The alert system consists of a K-type thermocouple in the outlet of each catalytic converter. A thermocouple measures temperature by generating a very small amount of electricity as it heats up. The thermocouple is attached to an ECU, which monitors the voltage and turns on the light when the voltage reaches a set point. My goal was to test the ECUs and test the thermocouples themselves. To do this, my buddy SL brought over an instrument meant for testing thermocouples.


The thermocouple ECUs are mounted to the end plate in the passenger's side footwell. I unscrewed this plate to expose the ECUs and the wiring. First, we tested the ECU operation. My putting the instrument into output mode, we could simulate the microvoltage as output by an actual thermocouple. After the first round of testing, we could see that the ECUs were good and behaved within 10 degrees F of each other. Using the instrument, we piped in a test signal of 36.05mV, which corresponds to a temperature of 1630 F. At this temperature, the slow down light begins to flash at an interval of about 13 seconds. As we cranked up the test temperature, the slow down light flashed faster and faster until it goes solid at 1710 F or 37.84mV. Wow, 1710 degrees. That's hot!

The next test was to check the output from the real thermocouples. We touched tester leads to the thermocouple wires and read 59 degrees F from each side with the engine not running. So far so good. The ambient temperature output was the same from both thermocouples at ambient temperature. Next, we started the engine and let it come up to temperature. Switching from side to side, we could see each thermocouple output increase at roughly the same rate. After a few minutes, we brought the engine up to 3000 RPM and held it there. As the temperature increased past 1000 F, it was clear that the rear bank was reading about 150-200 F higher than the front.

All in all, we spent probably 2-3 hours in testing. Our conclusion is that the slow down system is indeed working as intended and the rear bank is actually running hotter than the front. The next question is, what to do about it?

Sunday, July 8, 2012

Another Italian Superstar

My father passed away not too long ago and as our family was looking though some old photographs, I saw a few from "the early days" of my folks on my Dad's old Vespa scooter. I started thinking about how cool those images were and that it would be nice to have a scooter just like the one he had. I posted an old photo online and found out what model it was and started my search. In the end, a local Vespa club member found one for me -- a 1959 Vespa 150 VBA.


It was imported from Italy probably 10 years ago and has been in storage ever since. Surprisingly, it runs (although not well) and I've ridden it around the block a few times. Even though it's only 150cc with a three-speed manual transmission and in need of restoration, it's a blast to ride. The body is pretty straight and the only major bodywork is the floor needs to be replaced. At some point I'll strip it down and have someone do the body and paintwork while I redo the engine. It'll be nice to work on a vehicle where the engine and transmission together only weigh about 80 pounds.

Saturday, July 7, 2012

Tech Session

After an entire month of cancelled E@RTC sessions, one was finally scheduled for the first Saturday in July. Unfortunately, this was the same day our local chapter of Ferrari Club of America had a tech session set up at the local Ferrari dealership. I absolutely love geeking out on car tech so I opted to skip E@RTC this week. The tech session topic was maintenance on the F355 and 360 (neither of which I own, btw).

We started off with the F355. There was one in the shop for a major service. The F355 is an "engine out" car, which means that a major service involves removing the engine. What's cool is that on this car, the entire drivetrain (engine, transmission, rear suspension, etc) is mounted on a cradle that is removed as a single unit. To remove it, you drain the coolant, disconnect all the wiring connectors and hoses, unbolt the cradle the lift the car up.


Seeing the drivetrain cradle on a dolly is a pretty impressive sight. It was sitting a comfortable working height and you could wheel the thing around. Here the techs have replaced the belts and tensioners and the engine is set up with a degree wheel and dial indicators for final adjustment of the cams. The techs in this shop are required to be within 1 degree of the factory spec. After this is done and the motor buttoned back up, it'll go back in the car and have the 8 throttle bodies synchronized.


Next we moved on to a 360 Modena in the shop for the same major service. In the case of the 360, the engine does not have to be removed to do the work. Instead, they remove a bunch of stuff from the engine bay and pull the seats out of the interior and remove an access panel to get to the front of the engine. Nice to not have to pull the engine, but it must be tough working in this position.


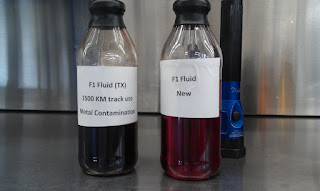
I'm sure you've heard people talk about the importance of changing your fluids. In cars equipped with an F-1 transmission, it's apparently critical to stick to the recommended fluid change schedule. Here are some fluid samples with new on the right and used on the left.


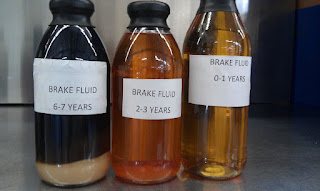
What about brake fluid? Brake fluid is hydrophilic, which means it absorbs water. That water then separates out in a milky goo. How do would you like to have that fluid on the left in your brake system?