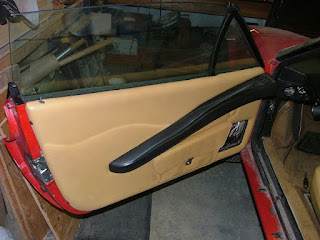
Race my windows, that is. It took most of the afternoon, but I ran the wires behind the dash and installed the window motor relays. Wow, I can't believe how much faster the windows are. Ok, they're not as fast as a modern car, but they're super-fast compared to how they were. In hindsight, I should have run the wires while the dash was out, but I guess I just wasn't thinking ahead. This relay modification requires a 12 AWG wire run out to each door. I had to sneak it along the other wire bundles as well as through the grommets in the doors. What a PITA. However, I think I'm done messing around inside the doors so I put the driver's side door panel and armrest back on. In looking at the door panel, I realized that the interior window scrapers are missing. On other cars, the scraper is attached to the upper lip of the door panel. I assume that's how it is on this car as well, but I'm not sure. I'll check around to see where I can pick up these parts.
Tomorrow is Thursday and with any luck, the carburetor parts should arrive.
Wednesday, December 30, 2009
Tuesday, December 29, 2009
Interior is looking better and better
I picked up another quart of contact cement and set out to secure the vinyl on the targa hoop trim piece. Once that was covered, I was able to attach all the pieces that make up the rear parcel shelf. I don't know if you can actually call it parcel shelf since it's only about four inches wide.
Now that these trim pieces are attached, I can put the rear quarter windows back in, as well as the rear side louvers.
Monday, December 28, 2009
Moving on the interior
This morning I placed a call to Pierce Manifolds and as luck would have it, they had the retaining clip that I lost from the Weber starting circuit. I ordered a handful, just in case I need more. While I was at it, I ordered some bigger idle jets. I suspect that the car is running a little lean, so I'm going to try replacing my size 55 jets with 60 and see what happens.
I decided to stay in the warm house today and work on the interior pieces. The old/new pieces of vinyl are in good shape, so I'm going to reuse them.
Good thing I was working where it is warm as the contact cement I was using needed it to be at least 65 degrees. After hours of drying and lots of pulling and stretching, five pieces are done, and I think they turned out pretty well. There is one piece that is giving me trouble -- the one that goes on the targa hoop. Since it is upside down, the vinyl needs to be secured really well to the supporting aluminum piece. I was running out of cement so I moved on to something else.
I had all the wiring connectors I needed, so I continued working on the window relay modification. I hooked it all up and before final installation in the door, I connected the power to see if the relays actually help. All I can say is, WOW. With the relays, the windows are 500% faster. No kidding, they're like the power windows on a normal car now! The next chance I get, I'll secure the relays and finally be able to put the door panels back on.
Sunday, December 27, 2009
Taking care of some small things
Since I've got some time to kill, I decided to work on some other things on the car. The first is to finish installing the relays in the power window mechanism to hopefully speed up the windows. I started, but then realized I did not have all the parts I needed. Fine, on to the next thing.
I noticed a while back that while the driver's door is perfectly aligned, the passenger's door is really sagging. It sags to the point where it doesn't close very well. The first thing I checked was the door pivot pins, as they are known to wear quickly. The pins look fine, and unfortunately there is no other adjustment on the door hinge. The only way to lift the back end of the door is to shim out the lower hinge.
As with all areas of this car, access is tight. The only way I could get at the hex hinge bolts was with a u-joint on my hex socket. Since there's not a lot of room for leverage, I enlisted my air impact hammer. I was able to get them all loose, but destroyed one in the process. I was a little worried since the head started to strip before the bolt loosened, but it eventually gave way. I put two washers under the lower hinge and now the door is lined up and closes like it should. I just need to go out and get a new hex head tapered metric bolt to replace the one I destroyed.
I also did a few other things to close off the front end. A while back, I had to open the brake system to remove the front caliper to get at an old plastic trash bag wrapped around the front hub. I finally got around to bleeding the system again and finally put the front wheels back on. I also installed the headlight louvers. Hey, it's starting to look like a real car again!
Saturday, December 26, 2009
Gotta take the bad with the good
After two days of stuffing my face with yummy holiday food, I set out to the shop to organize and find that darned synchrometer. It took a few hours, but I cleaned off my workbench and found the meter.
Ok, that's the good part. After cleaning up, I went to start the engine and noticed something strange. When the throttle is opened, a cam on each throttle shaft activates an accelerator pump which shoots more gas into the carb. The accelerator pump jet is right between the venturis and you can actually see a stream of gas as the pump is activated. The problem is, the pump on one of the carbs did not seem to be working. I decided to (once again) pull the carbs off to see what was the matter. I disassembled the carb and charged up my compressor to blow some air through. In what can only be described as a fit of stupidity, I did not completely disassemble the carb starting circuit before blowing air through it. The next thing I know, a jet of compressed air sends tiny carb parts flying into the dark corners of the shop. This seriously qualifies as a Bad ThingTM. By some miracle, I managed to find all the parts except one -- a spring clip that holds everything together. Pierce Manifolds in CA are the experts on Webers and have a large inventory of parts. I hope that they have this tiny part.
Sunday, December 20, 2009
Time to clean up again
At long last, the carburetors are back on the car. The engine runs, but really not any better at the moment. Because the carbs were completely disassembled, everything is out of whack and needs to be adjusted. Because there are four carbs, it's very important for them to be synchronized correctly. A few months ago, I got a tool called a Synchrometer to measure the airflow at each carb throat. The only problem is, I have no idea where the Synchrometer is in the shop. I remember seeing it a while ago, but now I can't find it. Time to organize again so I can find this thing.
Look at those clean carburetors!
Saturday, December 12, 2009
Carbs all done
Friday, December 11, 2009
Still at it...
Carb #2 -- done! The thing that takes the most time is the cleaning. I start by putting the entire carburetor into the ultrasonic cleaner for about 30 minutes. Then I take it apart and put the parts back in for another 15 minutes or so. With the help of a toothbrush, everything comes out squeaky clean and it's so much better working with clean parts.
The other thing that takes a lot of time is removing the butterfly shaft bearings. It would be much easier if I removed the butterfly plates and pulled the entire shaft, but I didn't want the hassle of removing then restaking the plate screws. Getting the bearings out involves a lot of prying, pulling and cursing. I'm getting faster though as getting carb #2 back together was faster than #1. With any luck, I'll be able to get the other two done tomorrow.
Tuesday, December 8, 2009
Carb rebuild -- part 2
Here is a photo of the "5 screw top" Weber DCNF 40 gasket (on the right) next to the "4 screw top" version. As you can see, they are pretty close, with the only difference being the holes at one end. Glad I was able to get the correct one.
Before I put the carb top back on, I adjusted the float height per Birdman's instructions. Here are the before and after shots -- big difference in cleanliness. Hopefully, the engine will run better with clean carbs. Provided I find time to work on it, the remaining three carbs should go pretty quickly.
Thursday, December 3, 2009
Carb rebuild -- part 1 (of many)
I got the correct gaskets now for the carbs so I decided to dive in. I took the carb apart and put all the pieces back into the ultrasonic cleaner. I used hot water and soap again and the results were actually really good.
Another thing I got was all new butterfly shaft bearings. The original ones are not sealed and can be a source of a vacuum leak. The new ones are SKF sealed bearings with lithium grease inside. I was able to get one old bearing out intact, but destroyed the other one pulling it out. It's a good thing I'm replacing them -- the intact one was pretty much seized up and barely moved.
For being a fairly simple part, a carburetor sure has a lot of parts. I only managed to get the new bearings and the linkage plates installed tonight. Hopefully I'll get a chance to finish it up tomorrow. Then it's one down, only three more carbs to go!
Monday, November 30, 2009
Cross country trip
No, I did not take a trip across the country and neither did the car. However, a part of the car did -- the headlight switch stalk. I had sent it all the way to the East Coast to Unobtainium Supply so Verell could fix the cracked pivot. Apparently, the cracking looked worse than it actually was. Verell told me that there is actually a metal plate under that plastic and that it was still structurally sound. Rather than spending the almost $200 to get a new pivot cast, I opted to just use it as is.
Of course, just like the dash, putting together is harder than the taking apart. I reassembled the switch, which required at least four hands to hold all the springs and such. The switch contacts are U shaped pieces of brass, which float on small springs. Putting a stalk back on meant having to hold two piece of brass on the springs, pushing in a ball bearing on another spring and then putting the whole thing on the switch hub without losing any parts. I ended up using some string to hold the brass pieces on while I wrestled with the ball bearing. The switch assembly has three stalks -- headlight, turn signal and wiper. Assembly took me well over an hour.
Finally back together, I bolted the switch assembly back onto the steering column and put the gauge cluster back in. My initial problem with the headlight low beams went away and now everything works.
Sunday, November 29, 2009
Starting on the carbs
I don't have my new carb gaskets yet, but I figured I'd start by removing all the carbs (again). I wanted to see how well this ultrasonic cleaner worked so I tried it out on one carb. You can see how nasty they are.
I started out with a mixture of hot water and dish soap. SL said this is what he usually uses so I figured I start there. When I lowered the carb into the water, I was expecting some crazy foamy, steamy cleaning action but what I got was...nothing. I mean, not nothing but much less than what I was expecting. The really loose surface dirt blew away pretty quickly but it didn't really touch the caked on grime. I pulled out the carb after 20 minutes and while it's a little cleaner, it's far from being completely clean. I guess I'll try it again with some other stronger solvent.
Dash vents
Before putting the dash back in, there is some old foam that needs replacing. There are five vents in the dash -- three in the middle and one on each side. Each of these vents is sealed to the ducts under the dash with foam. After 30 years, the foam has almost completely disintegrated.
The original foam measures about 3/4" wide by 1/4" thick. I picked up some adhesive backed insulating foam at the hardware store and it worked perfectly in this application.
It was true when I said this was the easiest dash I have ever removed. However, installation was another story. There is a small lip at the base of the windshield that the dash sits under. The trick was pushing the dash in while getting the leading edge under this lip. Pushing inward on the dash was no easy task as it was a pretty tight fit. At one point, I had to push the dash forward with my feet, then stop and reach forward to seat another small section under the lip, then push again. I would say it took ten times longer to get the dash in than out. Anyhow, the dash is installed again.
Friday, November 27, 2009
Do it right
A few days ago when I pulled out the stereo, I found an ugly repair job on some ground wires behind the dash. At first, I was just going to wrap it in electrical tape and call it good. I thought about this and decided against it because I didn't want to do a half-assed job to fix someone else's half-ass job.
I read about how easy it was to remove a 308 dash so I decided to try it. Sure enough, it was easy. After removing the instrument cluster, the dash is held in with 4 bolts and one screw. I've removed a few dashboards from various cars and I'd have to say that this was the easiest dash removal that I have ever done.
Access to the wires was wide open after the dash was removed. I spliced in three wires to replace ones that were nearly severed and wrapped everything with heat shrink tubing. I also soldered on new ring connectors. I think the damaged was caused by the wires chaffing against the side of the stereo so I re-routed the wire bundle under a wire keeper next to the main wire bundle. It's a lot neater now and there won't be a chance of the wires getting chaffed again.
Wednesday, November 25, 2009
Sir, you need to read the fine print
I've decided to rebuild my carburetors. The spitting and popping just isn't getting any better, and I figure I should just go ahead and tear those carbs apart. SL brought over his small ultrasonic cleaner and I'm looking forward to trying it out. Four sets of carb gaskets arrived, but looks like I need to try and return them. This car has four Weber DCNF 40 carbs, so I ordered gasket sets for a Weber DCNF 40. However, there are apparently two different types of DCNF 40s -- one with a four screw top and one with a five screw top. The gasket set is for a four screw top and guess what's on the car? Yep, a five screw top carb. There is a slight difference in the top gasket. I went back to the website I ordered it from and sure enough, it says "Weber DCNF 40 with a 4 screw top." That should have been enough to make me check, but somehow I missed that part. I guess carb rebuild will need to wait a little longer until I get the right gaskets.
Tuesday, November 24, 2009
Interior trim pieces
Here's what I'm faced with on interior upholstery. All of the covered trim pieces are made of aluminum (or aluminium for the Brits) and covered in vinyl over 1/2" open cell foam. My my count, I need to recover 8 pieces (rear shelf(2), rear side (2), rear upper (1), rear door jam (2) and relay/fuse cover (1). I've moved most of the operation inside where it's warm. The vinyl is creased from storage and I think I may try running an iron over it to flatten it out. Now I just need to convince TK that we're not going to die from the smell of contact cement in the house. To be continued...
Monday, November 23, 2009
You've got to slow down
As the days get short and the temperature drops, it's been tougher to carve out time to get in the shop. I'm waiting for my headlight switch stalk to return and thought I'd pay some attention to some things in the interior. Most of the electrical stuff works now, but a few remaining things bug me. One of them was the "slow down" lights.
This car has two catalytic converters -- one for cylinder banks 1-4 and the other 5-8. Each cat has a thermocouple to monitor temperature. If the cat temp gets too high, the thermocouple sends a trigger to an ECU and the corresponding "slow down" light comes on. When you start the car, these lights are supposed to come on for a few seconds, then go out. For some reason, my lights did not work at all. I looked at the wiring diagram and located the ECUs but did not see anything out of the ordinary. I pulled the light holders out of the dash and immediately saw the problem. Turn out that someone in the past pulled out the bulbs for the indicators! I put in some bulbs and magically, the lights come on at startup. Why would anyone disable an important system like this? If one of the cylinder banks has a problem and starts to overheat, I'd sure like to know!
Another thing I did was remove the stereo. I think that it works, but I wanted to pull it out to clean up some wiring. When I looked in the dash, I found this lovely gem.
Behind the stereo hole, there is a bundle of black grounding wires. Somehow, one of the wires had become severed and a few others were damaged. Some brainiac had soldered a patch wire in there and wrapped the mass in duct tape. Ugly. I guess I can sort of understand it -- they are only ground wires and it's incredibly tough to get in there to fix it right. Someone was just lazy and didn't want to do the work. Just short of removing the entire dash, there's not a simple way to get to the harness to do a proper fix. I read a few posts on F-chat about dash removal and it doesn't look too tough. I may do it just to be able to fix this correctly. Now's a good time anyway as I have the steering wheel off and column switches removed.
Aside from wiring, I also started working on interior upholstery. I spent a lot of time scraping and cleaning off the old foam. A few of the pieces now have new foam glued on and I may have to move the operation indoors where it's a little warmer. I'm using Welwood contact cement which is taking too long to dry in my cold shop.
The last thing I did was pull the right front brake caliper to pull out the stupid plastic bag that got wrapped around the axle. However, it's not so simple as there is a hard brake line covering one of the mounting bolts.
I removed the brake line and the fluid started to come out. Even though I stuffed part of a rag into the hole, I could not keep it from leaking. I got the caliper off, pulled out the rest of the plastic and put the caliper back on as quickly as I could but was still left with a huge mess on the floor. By then it was cold and dark and my finger was gushing blood from getting smashed by an ill-aimed mallet blow so I decided to call it a night.
Thursday, November 12, 2009
Todo list is getting long again
It seems like I keep finding things to add to the todo list. At some point during it's storage life, the wheels were covered in plastic garbage bags. The reason I know this is that the right front wheel had bits of plastic bag all twisted around the hub spindle. I was able to remove most of the plastic, but there are more pieces stuck between the brake pad and the rotor. To remove the rotor, it should be a simple matter of loosening the bolts. Not so. The upper mounting bolt is partially obscured by a hard brake line. To get to the bolt, I need to remove the line. Removing the line means re-bleeding the brake system (which as you'll recall I just did a few weeks ago).
*sigh*
Add that to the list...
I also decided last weekend that the engine just runs too poorly and the carbs do really need some attention. I ordered rebuild kits (I need 4 of them) and they should be here before the weekend. A few days ago, I stopped by a fabric store and got a small roll of 1/4" open cell foam for the interior. I also have most of the pieces to wire the relays for speeding up the windows. If all goes well, I should get my repaired headlight stalk back in a couple of weeks.
Monday, November 9, 2009
And time passes...
Time does pass, but you can't really tell because the clock in the car is broken. Well, not completely broken -- it works but the little knob to adjust it is missing. I decided to pull it apart to see if it was something I could fix. The clock is located in a 2-gang instrument cluster off the driver's left knee. I pulled off the cluster, removed the clock mounting bracket and it slid right out. Getting it apart without destroying was tricky. There is a chrome trim ring hold it together and the ring needed to be carefully pried apart. I managed to save it and open the clock. As luck would have it, it appears that the only thing missing is the knob shaft. The adjuster gear is still in place, held by a small spring. I just need to find a shaft the correct size to go back into the hole.
A few weeks ago when SL was helping me, he was bolting the oil cooler back on and noticed the mounting studs were a little beat up. I ordered some new ones and put them on. Good thing too because one of the mounts completely separated and the other one was almost as bad.
Someone in the past had replaced the ignition point system with an electronic ignition. It's an Allison XR700 system (now Crane Ignition) and there are two control units -- one for each distributor. The only problem was, the control units were zip tied together and attached to the left side intake ductwork. Needless to say, it looked a little cheesy and I wanted to redo the mounting. I made a little mounting platform from sheet metal and mounted the boxes to it. The mount itself is attached to the same mounting point as the left side duct.
I also closed up the access panels under the front of the car and sorted through the loose interior parts. Most of the trim panels had been recovered, but pretty badly. I'm not really sure why because the original vinyl still looked pretty good. I decided to pull the new vinyl off, clean the original and mount them back into the interior. The only problem is that the foam on some of the trim was trashed so I need to try and locate some replacement before I can finish the interior.
Sunday, November 1, 2009
Headlight switch removed and passenger side work
To get to the broken headlight switch, I had to remove the steering wheel hub, which was held on by a special nut. Since I didn't want to spend $100 and wait a week for the special tool, I made one out of a 1 1/4" socket. After about 15 minutes with the angle grinder, I had a tool that would work with this nut.
You know how there are those things you keep around the house, "just in case you might need it?" Well, I had one of those. After removing the nut, I found the steering wheel hub to be stuck on the shaft. I remembered that I had a steering wheel puller at one point. I even remembered seeing it recently. I haven't needed to pull a steering wheel in over 20 years and yet, here I was needing a puller. It was hiding in a cabinet with some other hardware and after drilling a few new holes, I was able to pull the hub off and remove the switch assembly.
The switch pivot is definitely cracked, but it's actually more structurally sound than I thought it would be. Still, since I have the thing apart, I'm going to get it fixed correctly.
On to the next task for the day, which is the passenger side door. I put the latch back on and reassembled the door lock. The car was missing a window switch, and I had to order one. I hooked it up and hit the switch to find that the passenger power window was slower than the driver window. Onward with disassembly.
Here is the motor assembly which moves the window. The window is controlled by a long cable fished in a crazy way through the door. The ends of the cable are wrapped around a drum, which is powered through a worm gear drive and a motor. Most of these mechanisms are siezed up by 25+ year old grease which makes the drive really slow. Neither side for me was really bad. The grease was not completely solid, although it was pretty heavy. I cleaned up everything and added a healthy dose of lithium grease.
You can sort of see the way the cables run inside the door in this photo. After reassembly, the window moved, but was still very slow. Next I will put some relays in the motor circuit which show speed things up a bit.
Wednesday, October 28, 2009
Working brake lights!
The easiest way to get my brake lights working again would have been to buy the OEM brake light switch. However, the plastic of the original one seemed pretty cheesy and I wanted one that wouldn't melt quite as easily. I don't know if it's any better, but I found one made by Painless Performance. These guys make wiring harnesses and components for mostly old American muscle cars, but it seemed like this switch would work. It's rated 20 amp and besides, I really like the name of their company. As if wiring is painless...
Anyhow, you can see the new switch is quite a bit shorter than the original. Also, the threads on the body are not the same so I had to make a few modifications. First, I used a 12mm x 1.75 die to cut new threads so it matched the original. No big deal because it's plastic and the die cut pretty easily. The second is I needed to extend the plunger so the length is correct. Strangely, the white plastic of the old switch is the same as white plastic plunger in the new switch. I simply drilled a hole in the new plunger tip, and stuck the old plunger in it. A little heat from my micro-torch to fuse the plastic together and voila! The new switch is now a perfect replacement for the old one.
With a little more contorting to get back under the dash and some adjustment of the switch position, I now have working brake lights!
Saturday, October 24, 2009
New fuel pump and now I know why my lights are flaky
Every now and again, my fuel pump would make a horrible screeching sound. It was intermittent, and would only last a few seconds. I decided that before I drive this car, I should replace the pump before it dies completely. The original one is NLA and a number of people on F-Chat said a Pierburg pump was a good replacement. It's actually listed as a replacement for a carb'd Porsche 911.
It is quite a bit different than the OEM one. The fuel flow is from one end to the other whereas the original was in and out the side at the bottom. Good thing I had some extra fuel line for the new configuration. Installation was pretty straightforward. There is no longer a screeching noise from the back and the new pump is about as loud as the old one.
On to the next thing. I figured out why my brake lights didn't work. After contorting myself to get under the dash, I removed the brake switch from the pedal. The thing is plastic with a crimped metal band to hold the pieces together. After pulling it apart, I could see that the plastic had melted around the contacts and the switch plunger had basically fused itself to the switch body. It's not fixable so I'll have to source a replacement. Hopefully, I can find one that's not plastic.
I took a closer look at my headlight switch too. The headlights went up and down as they should, but the low beams didn't always work and now I know why. The headlight stalk is cracked at the base, right near the pivot point. These are NLA as well, although Verell at the Unobtainium Supply Company will cast a new one. The repair will be stronger than the original one. I need to pull the steering wheel hub off, which of course takes a special tool.
It doesn't seem like it, but the todo list is slowly getting shorter. Done today:
- Put driver's door lock mechanism and door latch back together
- Put hood back on
- Replaced remaining relays
- Replaced fuel pump
- Cleaned and lubricated driver's window mechanism
I didn't get any pictures, but I removed and disassembled the power window assembly per Birdman's instructions. The window is a little faster, but not much. Next will be to install some relays in the wiring which will reduce the voltage drop to the motor.
Subscribe to:
Posts (Atom)